
Get started
Make your first request with Voyageage
Start with your account, balance, and API key.
Recommended — Prefer a graphical setup?
Use CC Switch to configure VoyageAge for Claude Code and Codex without manually editing configuration files.
Before configuring a client, identify three values: the API key proves which account is calling, the Base URL tells the client where to send requests, and the model ID selects the model.
Note: Last reviewed on
2026-07-31. Client screens can change, but endpoints and model IDs should always follow VoyageAge Console.
1. Prepare your account and balance
- Register or sign in to VoyageAge.
- Add balance with an available payment method.
- Refresh Console and confirm that the balance has updated.
2. Create an API key
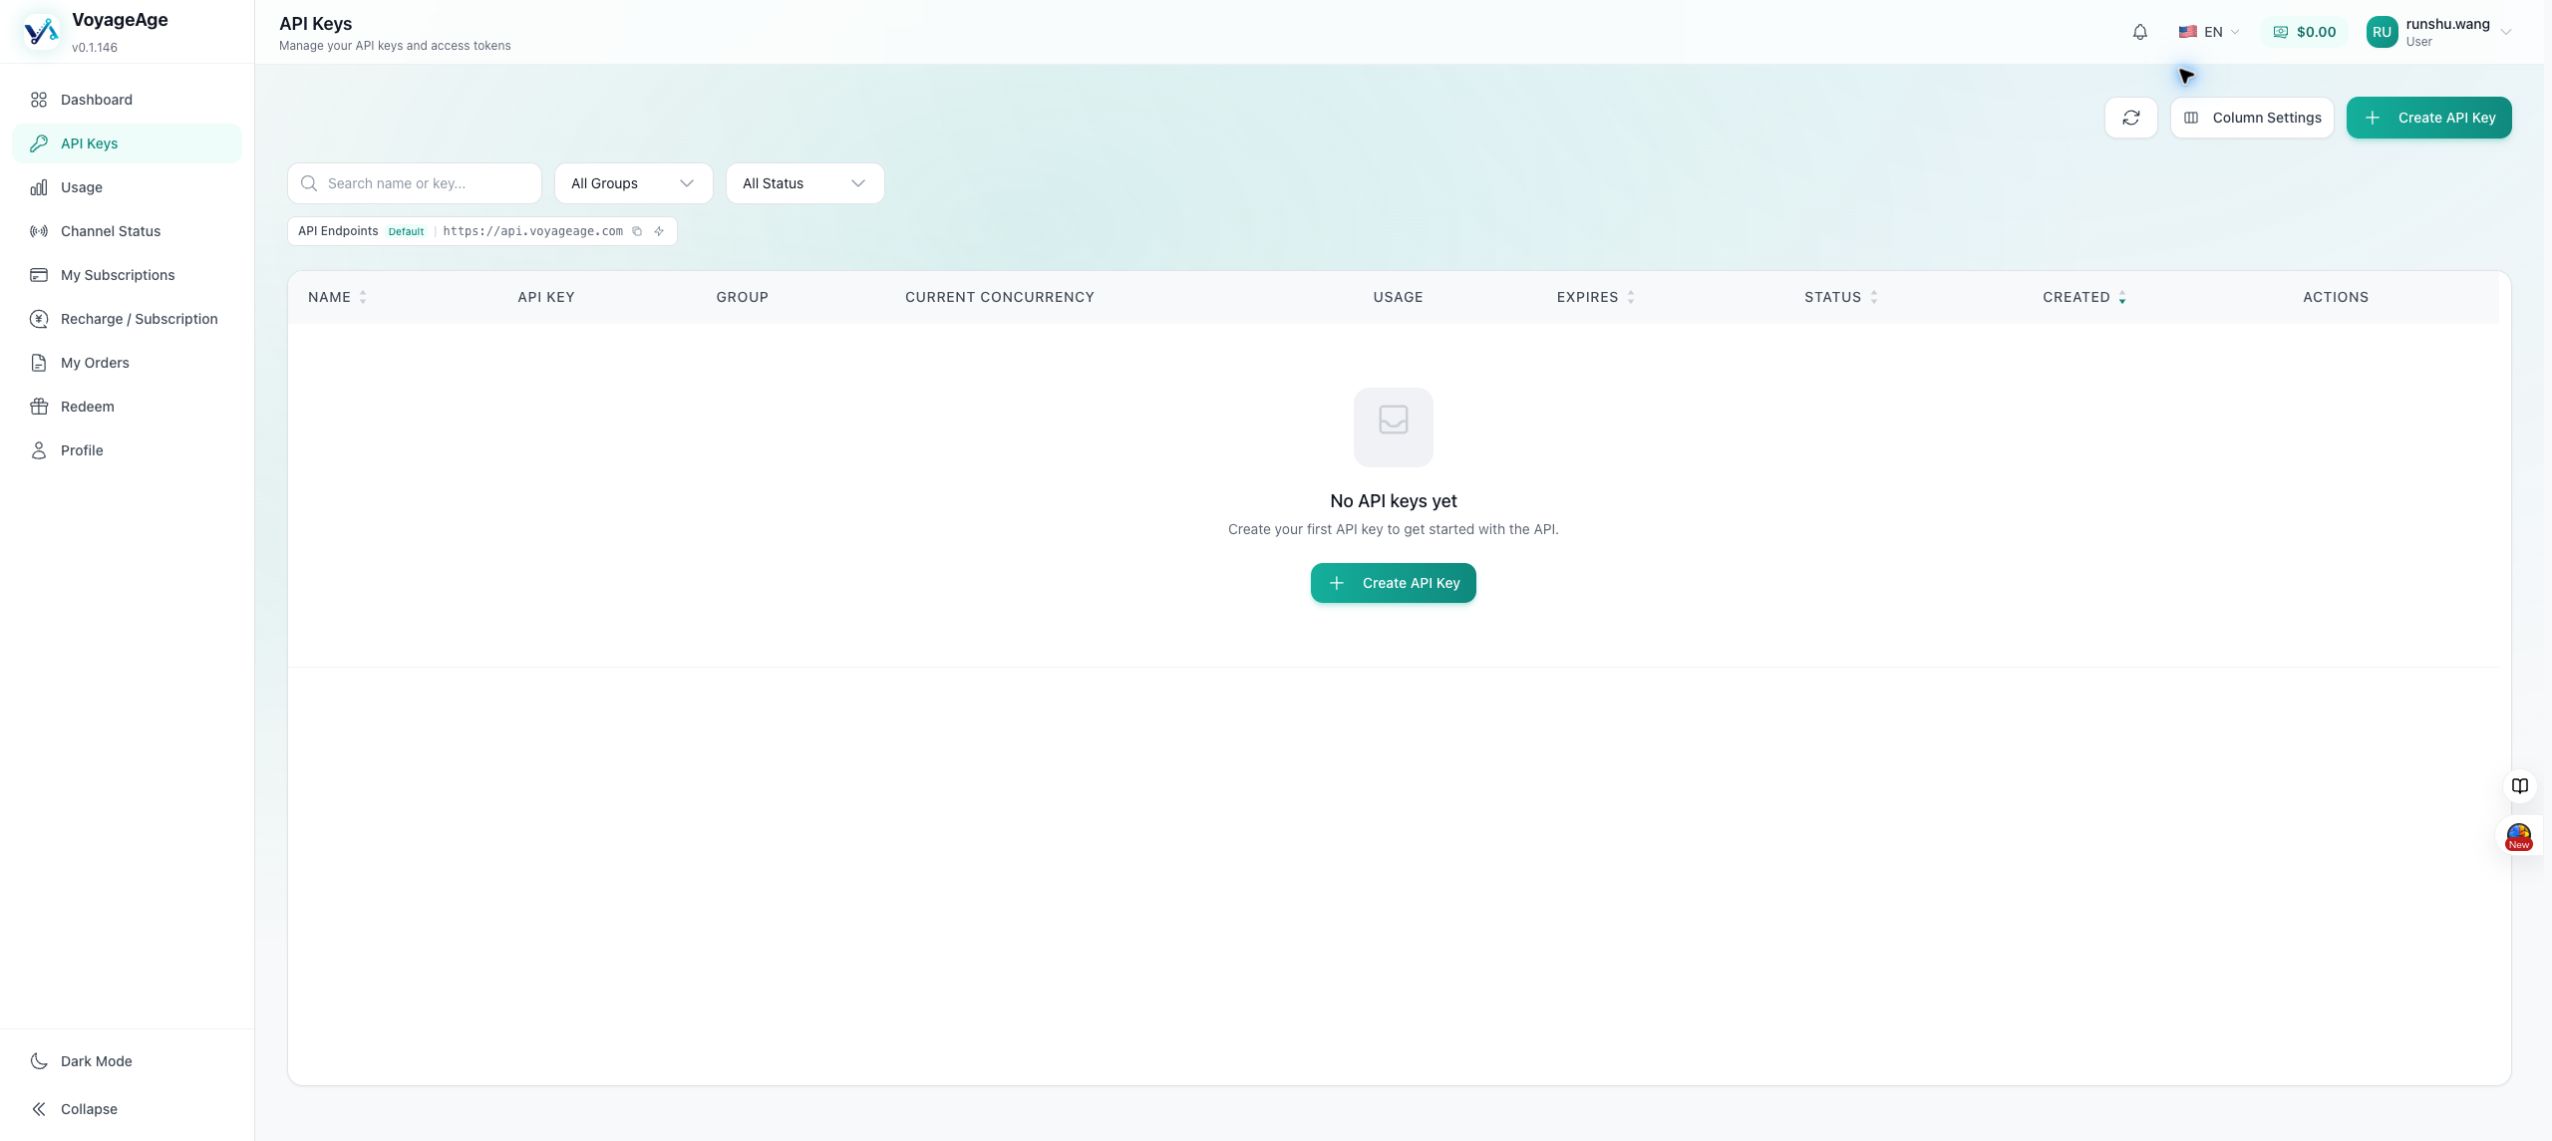
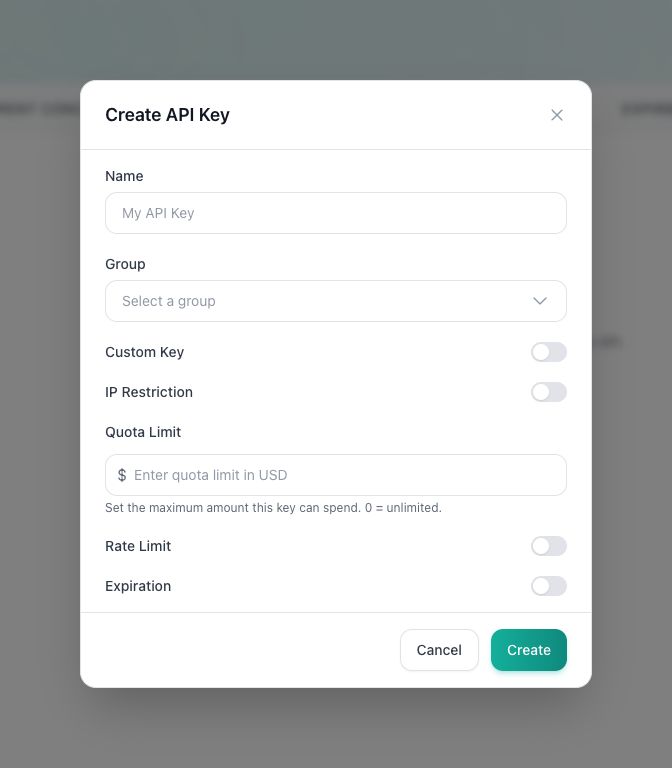
- Open API Keys in Console.
- Create a dedicated key for the client you are configuring.
- Save the full key in a password manager before closing the dialog.
Note:
YOUR_VOYAGEAGE_API_KEYis a placeholder. Never put a real key in Git, screenshots, chat history, or browser code.
3. Choose the correct Base URL
| Where you enter it | Value |
|---|---|
OpenAI SDK or a Base URL field that expects /v1 |
https://api.voyageage.com/v1 |
A graphical client that appends /v1/chat/completions |
https://api.voyageage.com |
| Claude / Claude Code Anthropic Base URL | https://api.voyageage.com |
| Current model list | https://api.voyageage.com/v1/models |
Do not paste https://api.voyageage.com/v1/chat/completions into a field labeled only Base URL unless that client's guide explicitly asks for the full endpoint.
4. Get a current model ID
Copy a model ID from Console or request the model list instead of copying an old screenshot.
Windows PowerShell
$headers = @{ Authorization = "Bearer YOUR_VOYAGEAGE_API_KEY" }
Invoke-RestMethod -Uri "https://api.voyageage.com/v1/models" -Headers $headers
macOS / Linux
curl "https://api.voyageage.com/v1/models" \
  -H "Authorization: Bearer YOUR_VOYAGEAGE_API_KEY"
Examples from the shared OpenAI model data are gpt-5.6-sol, gpt-5.6-terra, gpt-5.6-luna. Availability still depends on your API key.
5. Send a first test request
Windows PowerShell
$headers = @{
  Authorization = "Bearer YOUR_VOYAGEAGE_API_KEY"
  "Content-Type" = "application/json"
}
$body = @{
  model = "gpt-5.6-sol"
  messages = @(@{ role = "user"; content = "Reply only: VoyageAge connected" })
} | ConvertTo-Json -Depth 4
Invoke-RestMethod -Method Post -Uri "https://api.voyageage.com/v1/chat/completions" -Headers $headers -Body $body
macOS / Linux
curl "https://api.voyageage.com/v1/chat/completions" \
  -H "Authorization: Bearer YOUR_VOYAGEAGE_API_KEY" \
  -H "Content-Type: application/json" \
  -d '{"model":"gpt-5.6-sol","messages":[{"role":"user","content":"Reply only: VoyageAge connected"}]}'
Success: The terminal returns a model response and a new request appears in VoyageAge Console usage. This confirms the request passed through VoyageAge.
Common errors
- 401 Unauthorized: The key is invalid, deleted, or contains spaces. Create a new key and replace the entire placeholder.
- 403 Forbidden: The account or key cannot access the selected group or model. Check key scope and account status.
- 404 Endpoint Not Found: A Base URL and a full endpoint were mixed. Use the exact value in the selected client guide.
- Model Not Found: Request
https://api.voyageage.com/v1/modelsagain and copy the complete model ID. - Insufficient Balance: Add balance, then retry.
- 429 Too Many Requests: Reduce request rate or concurrency and retry later.
- Success but no usage record: Confirm the client is not still using
api.openai.com, then check the Console account and time range.
Choose your client from the left navigation to continue.
Get started
Use VoyageAge with CC Switch
Configure Claude Code, Codex, and other coding agents without manually editing configuration files.
CC Switch is the recommended graphical path for configuring VoyageAge across coding agents. It manages provider settings for you while the existing Codex and Claude Code guides remain available for manual configuration.
Recommended
Best for Claude Code, Codex, developers switching between multiple AI providers, and anyone who prefers a graphical interface.
Step 1 — Install CC Switch
CC Switch is a cross-platform GUI provider manager for Claude Code, Codex, Gemini CLI, OpenCode, and other coding agents.
- Open the official CC Switch website for the current installation options.
- Use the official GitHub repository or its Releases page if you prefer to inspect and download releases directly.
Install the current version for Windows, macOS, or Linux, then open CC Switch. Avoid third-party download sites.
Step 2 — Add VoyageAge
Create an App-specific Provider for each client you use. In CC Switch, select the client at the top, click +, and choose Custom Configuration.
Claude Code
Fill the Claude Code provider form with:
| CC Switch field | Value |
|---|---|
| Provider Name | VoyageAge |
| API Key | YOUR_VOYAGEAGE_API_KEY |
| API Endpoint | https://api.voyageage.com |
| Upstream Format | Anthropic Messages (Native) |
| Auth Field | ANTHROPIC_AUTH_TOKEN (Default) |
| Main Model | Select a current model; claude-opus-5 is only an example |
Keep the native Anthropic format: VoyageAge already exposes the Anthropic-compatible endpoint Claude Code expects, so local protocol conversion is not required.
Codex
Fill the Codex provider form with:
| CC Switch field | Value |
|---|---|
| Provider Name | VoyageAge |
| API Key | YOUR_VOYAGEAGE_API_KEY |
| API Request URL | https://api.voyageage.com/v1 |
| Default Model | Select a current model; gpt-5.6-sol is only an example |
| Upstream Format | OpenAI Responses API (Native) |
| Needs Local Routing | Off |
VoyageAge supports the OpenAI Responses API. Select the native Responses format so Codex connects directly; no Chat Completions → Responses protocol conversion is required.
Do not mix the Base URLs
| Client | Base URL |
|---|---|
| Claude Code | https://api.voyageage.com |
| Codex | https://api.voyageage.com/v1 |
Claude Code needs the API origin. Codex needs the /v1 Base URL. Do not append /v1/messages or /responses yourself.
Step 3 — Select a model
After entering the API Key and endpoint, use Fetch Models beside the model field. CC Switch requests the provider's OpenAI-compatible /v1/models list and lets you choose from the returned IDs.
- OpenAI / Codex examples:
gpt-5.6-sol,gpt-5.6-terra,gpt-5.6-luna - Anthropic / Claude Code examples:
claude-opus-5,claude-fable-5,claude-opus-4-8
These are examples, not permanent requirements. Model availability may change and depends on your API key. Use VoyageAge Console or request https://api.voyageage.com/v1/models to see what is currently available. If Fetch Models cannot reach the endpoint, enter an exact model ID from that list manually.
Step 4 — Enable VoyageAge
Save the provider, find VoyageAge on the provider card, and click Enable.
- Claude Code: CC Switch applies provider changes immediately. If a session does not pick up the change, open a new terminal and start Claude Code again.
- Codex: close the running Codex client or terminal, reopen it, and start a new session. Codex reads the provider and model catalog at startup.
Step 5 — Verify the connection
Start the configured client and send:
Reply only: VoyageAge connected
Then open VoyageAge Console → Usage and confirm that a new request appears with the selected model. The Console record is the evidence that the request actually passed through VoyageAge.
Success: The client replies with “VoyageAge connected” and VoyageAge Console shows the matching request.
Manual configuration is still available
Prefer direct control over your files and environment? Continue with the Codex CLI manual configuration or Claude Code CLI manual configuration. CC Switch is the easiest path, not a requirement.
Note: Never put a real API key in a URL, deep link, screenshot, repository, analytics event, or console log. Enter it only in CC Switch's API Key field.
Desktop clients
Codex Desktop
Configure Voyageage for Codex in the ChatGPT desktop app.
Codex now lives in the ChatGPT desktop app. This guide adds VoyageAge as a custom model provider in the user-level Codex config.toml on Windows or macOS.
Note: Last reviewed on
2026-08-25. The former standalone Codex app is moving into the ChatGPT desktop app; existing projects and configuration normally remain available.
1. Before you start
- Create a dedicated VoyageAge API key and make sure your account has balance.
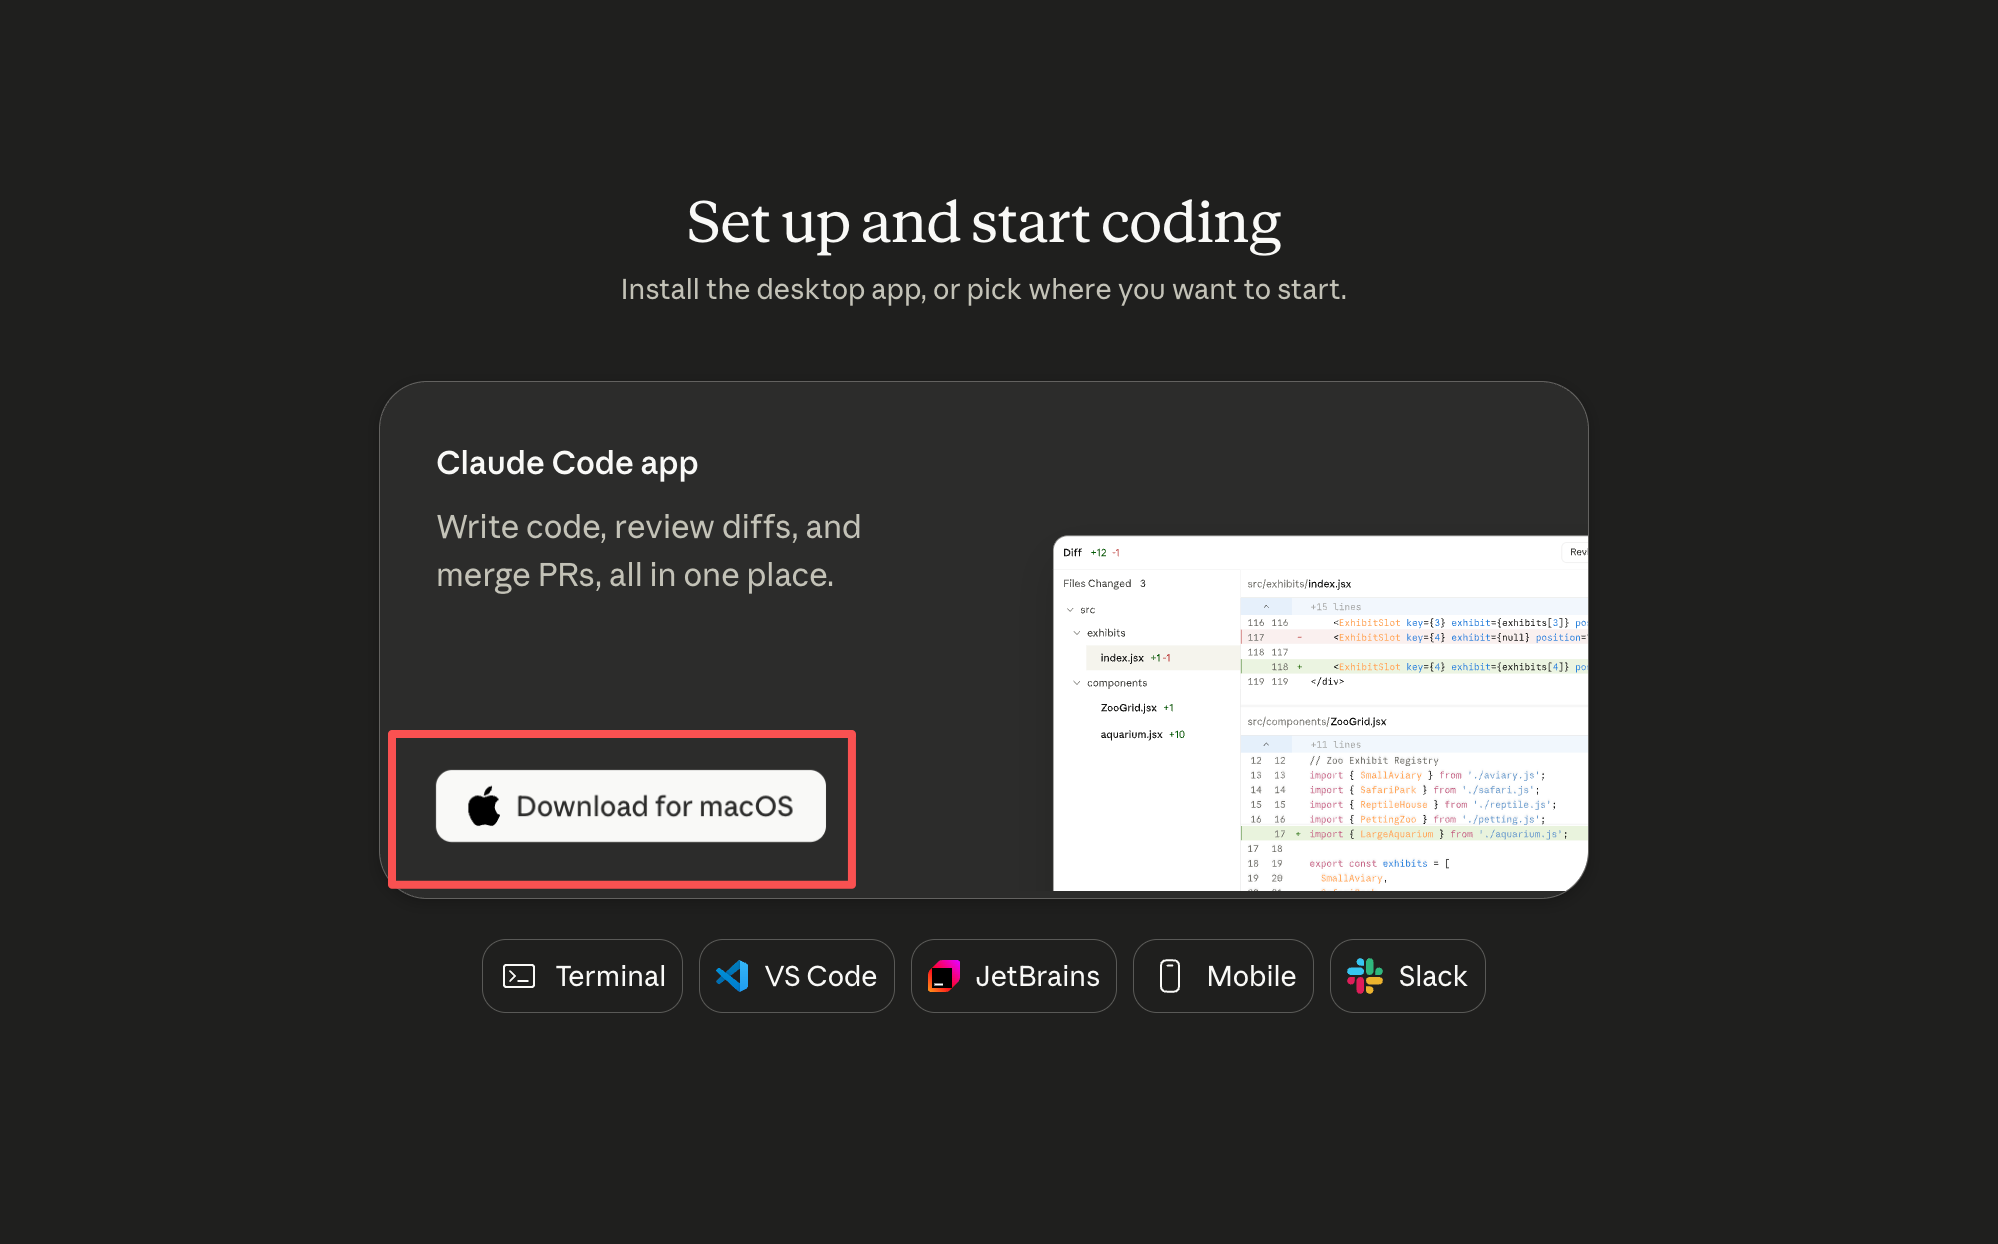
- Install or update the app from the official ChatGPT download page.
- Base URL:
https://api.voyageage.com/v1 - Example model:
gpt-5.6-sol - Fully quit the running ChatGPT/Codex app.
Use a model returned by https://api.voyageage.com/v1/models that supports the Responses endpoint.
2. Back up existing configuration
Windows PowerShell
New-Item -ItemType Directory -Force -Path "$HOME\.codex" | Out-Null
Copy-Item "$HOME\.codex\config.toml" "$HOME\.codex\config.toml.backup" -ErrorAction SilentlyContinue
Config path: %USERPROFILE%\.codex\config.toml.
macOS
mkdir -p ~/.codex
test -f ~/.codex/config.toml && cp ~/.codex/config.toml ~/.codex/config.toml.backup
Config path: ~/.codex/config.toml.
3. Add the VoyageAge provider
Merge this into the user-level file. Edit an existing top-level key instead of creating duplicate keys.
model_provider = "voyageage"
model = "gpt-5.6-sol"
model_reasoning_effort = "high"

[model_providers.voyageage]
name = "VoyageAge"
base_url = "https://api.voyageage.com/v1"
env_key = "VOYAGEAGE_API_KEY"
wire_api = "responses"
The dedicated VOYAGEAGE_API_KEY variable avoids overwriting an existing OPENAI_API_KEY.
4. Set the API key
Windows PowerShell
[Environment]::SetEnvironmentVariable("VOYAGEAGE_API_KEY", "YOUR_VOYAGEAGE_API_KEY", "User")
Close every ChatGPT/Codex window and reopen the app.
macOS Terminal
launchctl setenv VOYAGEAGE_API_KEY "YOUR_VOYAGEAGE_API_KEY"
Quit and reopen the app. This launchctl value applies to the current login session and must be set again after signing out or restarting macOS.
Note: Do not store the real key directly in
config.toml. The official custom-provider configuration supports reading it throughenv_key.
5. Verify
- Open the ChatGPT desktop app and switch to Codex.
- Open a test folder.
- Ask:
Count the files in this folder without modifying anything. - Confirm a
responsesrequest appears in VoyageAge Console with the configured model.
Success: Codex replies and Console shows the same request, confirming it did not use the official OpenAI endpoint.
6. Restore the previous provider
Windows PowerShell
Copy-Item "$HOME\.codex\config.toml.backup" "$HOME\.codex\config.toml" -Force
[Environment]::SetEnvironmentVariable("VOYAGEAGE_API_KEY", $null, "User")
macOS
cp ~/.codex/config.toml.backup ~/.codex/config.toml
launchctl unsetenv VOYAGEAGE_API_KEY
Fully restart the app after restoring configuration.
Troubleshooting
- Codex still calls OpenAI: Confirm you edited the user-level file and that the active top-level
model_providerisvoyageage. - 404 Endpoint Not Found: Use
https://api.voyageage.com/v1andwire_api = "responses"; do not append/responsesto the Base URL. - Model Not Found: Copy a current Responses-capable model from
https://api.voyageage.com/v1/models. - TOML parse error: Remove duplicate top-level keys and verify quotes and
[model_providers.voyageage]. - Changes do not apply: Quit the complete app process, not only one window.
- No Console usage: Confirm Codex did not switch back to another provider and check the correct Console account and time range.
The following upgrade-specific fixes are exception paths and do not change the normal setup above.
Fix: approval_policy="untrusted" is no longer supported
Error
Codex Exec exited with code 1:
Error: approval_policy="untrusted" is no longer supported; remove this setting
Cause
After a Codex Desktop update, the bundled Codex runtime reloads the user-level config.toml. If an older configuration still contains approval_policy = "untrusted", runtime 0.149.0 fails during configuration loading. This is a local Codex configuration compatibility issue—not a VoyageAge API outage, network problem, bad API key, or unavailable model. A request may not have reached VoyageAge yet.
Configuration paths:
- Windows:
%USERPROFILE%\.codex\config.toml - macOS / Linux:
~/.codex/config.toml
Fix
If you only need Codex Desktop working again, remove this line:
approval_policy = "untrusted"
If you want to explicitly select a currently supported policy, choose one that fits your security requirements, for example:
approval_policy = "on-request"
sandbox_mode = "workspace-write"
on-request is not behaviorally identical to the former untrusted mode; do not treat it as an equivalent replacement. Save the file, fully quit Codex Desktop, and also quit VS Code or the launcher if it started Codex. Then reopen the app.
Verify
Codex Desktop opens and starts a session without Codex Exec exited with code 1 or the untrusted no longer supported configuration error.
Fix: Codex Desktop 0.149.0 401 Unauthorized after upgrading
Error
Some users may encounter 401 Unauthorized, authentication failed, or API key failure after updating Codex Desktop or its bundled Codex runtime to 0.149.0 while using an OpenAI-compatible custom provider such as VoyageAge. This does not affect every 0.149.0 installation.
Cause
If the same VoyageAge API key worked immediately before the update, check the Codex Desktop custom-provider authentication configuration first instead of assuming the VoyageAge API is down. The Desktop process may not have inherited the environment variable named by env_key. The compatibility configuration below was checked against the Codex 0.149.0 schema and VoyageAge routing.
Fix
Back up config.toml, then replace the active provider configuration with:
model_provider = "OpenAI"
model = "gpt-5.6-sol"

[model_providers.OpenAI]
name = "OpenAI"
base_url = "https://api.voyageage.com"
requires_openai_auth = false
experimental_bearer_token = "YOUR_VOYAGEAGE_API_KEY"
wire_api = "responses"
OpenAI is a case-sensitive custom provider ID here; the top-level value and table name must match. Codex 0.149.0 appends responses to this root address, producing https://api.voyageage.com/responses, which the current VoyageAge backend accepts. Do not append /responses to base_url yourself.
requires_openai_auth = false does not disable authentication. It means this custom provider does not depend on an official OpenAI login; VoyageAge still authenticates the request with the API key in experimental_bearer_token as a Bearer token. The 0.149.0 schema neither needs nor accepts preferred_auth_method inside this provider, so do not add it.
Warning: This compatibility configuration stores the API key in local
config.toml. Never commit aconfig.tomlcontaining your real VoyageAge API key to Git, and never include your key in screenshots, GitHub issues, or public support messages. ReplaceYOUR_VOYAGEAGE_API_KEYlocally, but restore the placeholder before sharing the file.
Save the file, fully quit Codex Desktop, VS Code, and any launcher process, then reopen the app.
Verify
Send a read-only test request. Success means Codex replies, the matching responses usage appears in VoyageAge Console, and 401 Unauthorized no longer appears. If the request still returns 401, recreate the VoyageAge API key, check for surrounding spaces, and confirm Codex loaded the user-level config.toml.
Desktop clients
Cherry Studio
Add an OpenAI-compatible provider, fetch models, and test the connection.
Cherry Studio is a graphical multi-model client. Add VoyageAge as a custom OpenAI provider to fetch models, test the connection, and select a model in chat.
Note: Last reviewed on
2026-07-31. Depending on the version, “Model Services” may be labeled “Providers”.
1. Before you start
- Create a dedicated VoyageAge API key and make sure the account has balance.
- Install the current Cherry Studio.
- Provider type:
OpenAI - API address:
https://api.voyageage.com - Model list:
https://api.voyageage.com/v1/models - Chat endpoint:
https://api.voyageage.com/v1/chat/completions
Enter only the root API address. Cherry Studio appends /v1/chat/completions automatically.
2. Add the provider
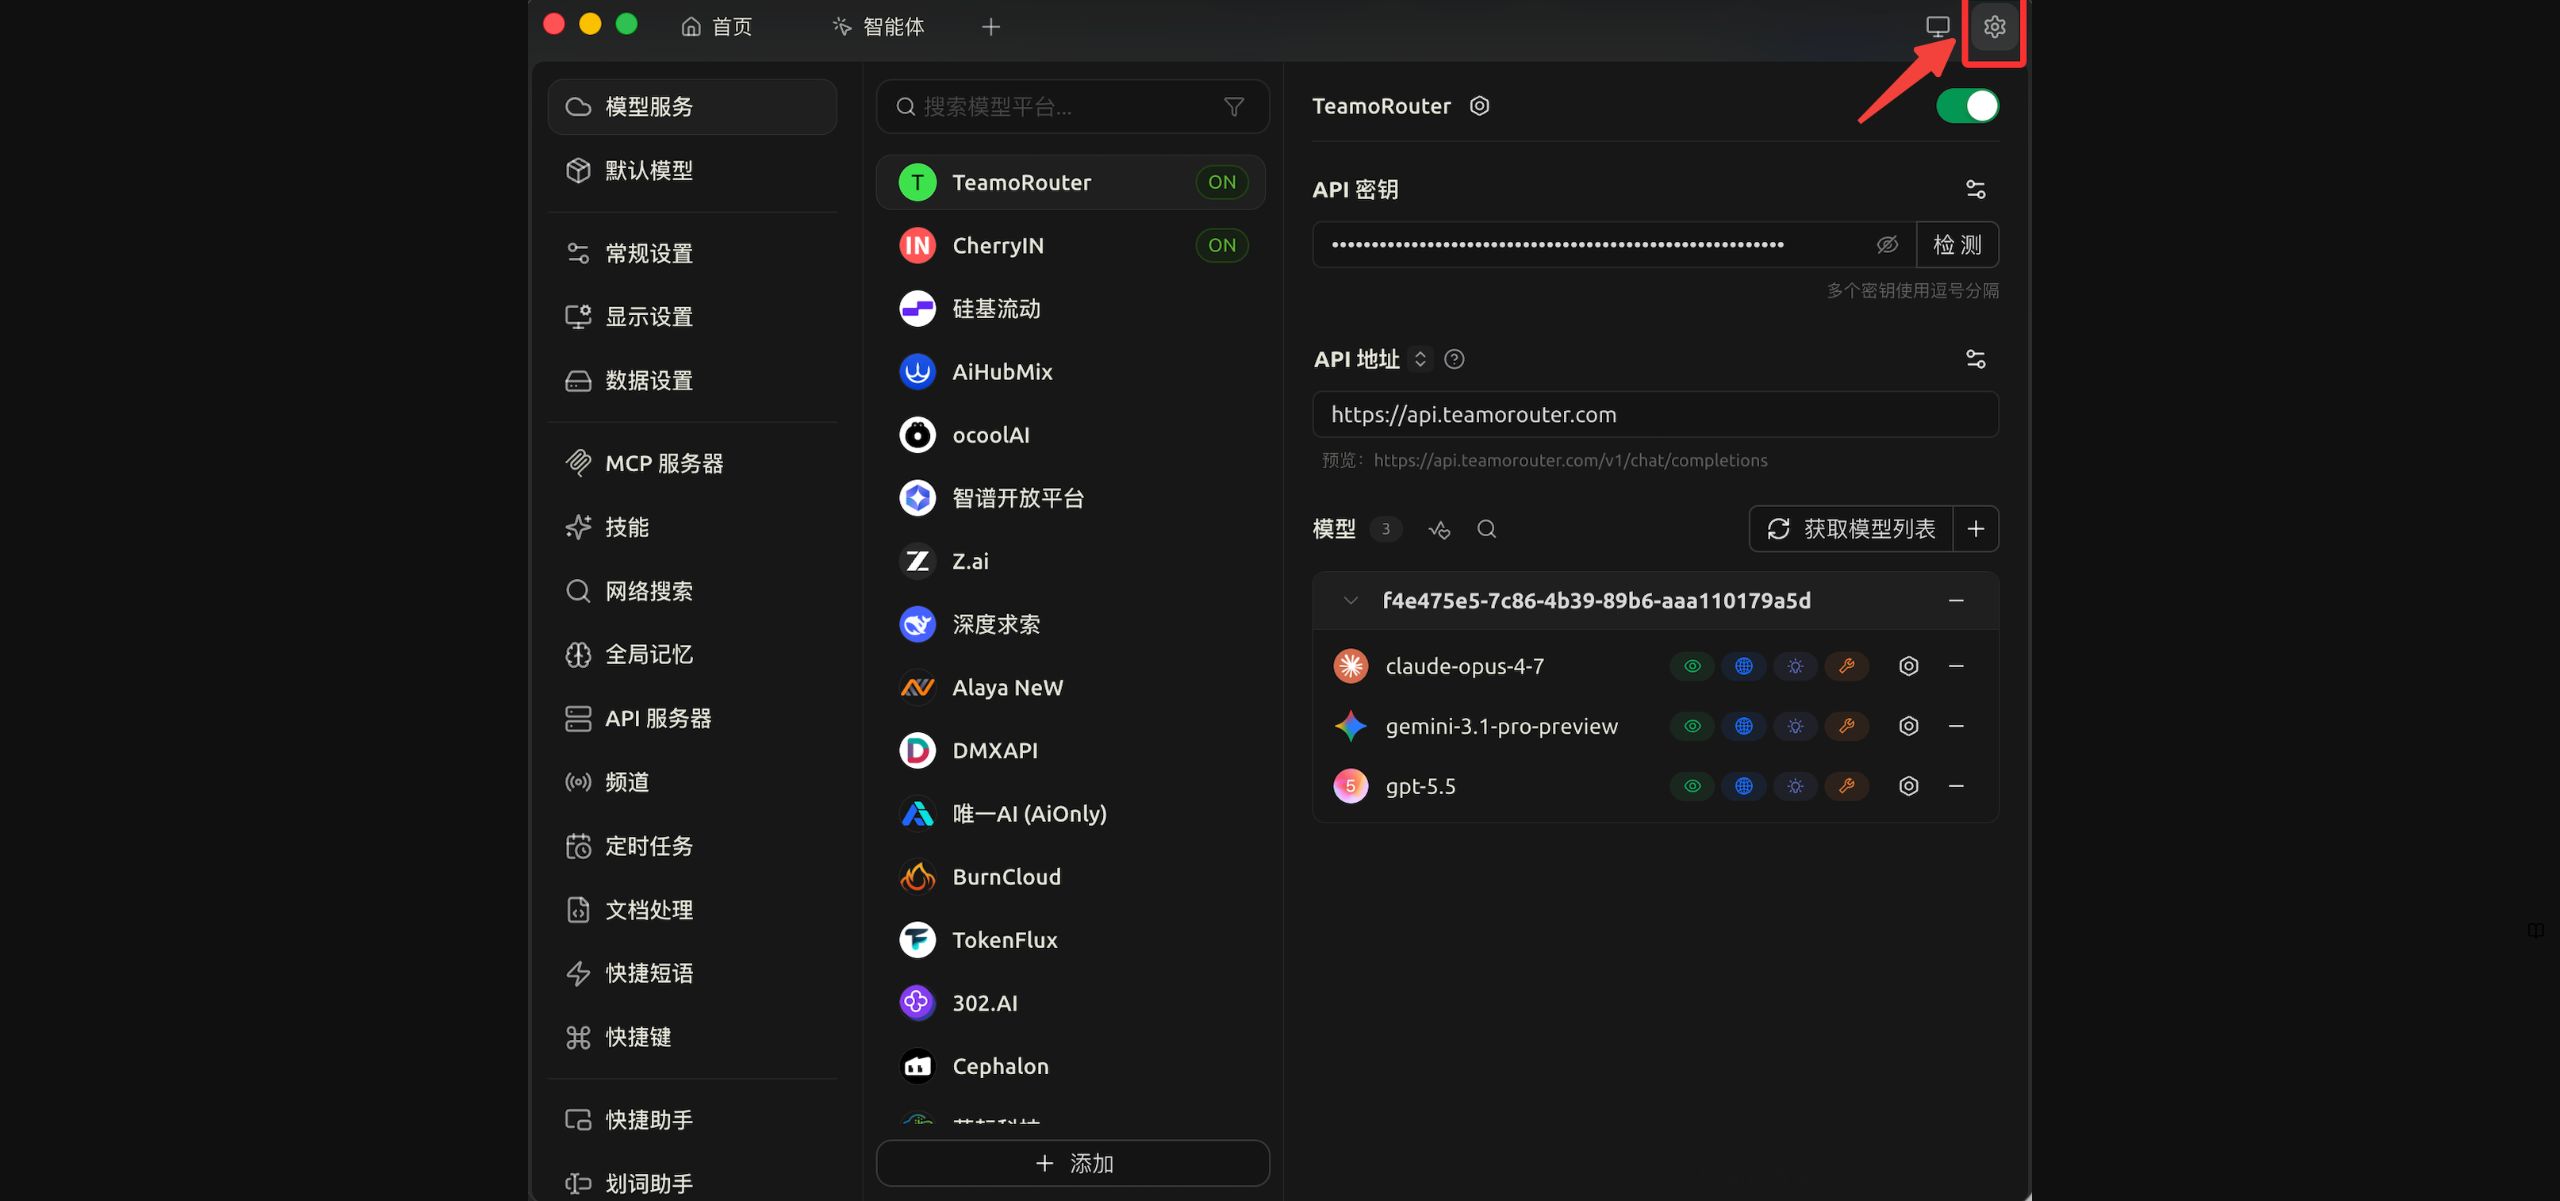
- Open Cherry Studio and select the gear icon.
- Open Model Services.
- Select Add below the provider list.
- Name it
VoyageAgeand choose provider type OpenAI.
3. Enter the API values
| Field | Value |
|---|---|
| Provider name | VoyageAge |
| Provider type | OpenAI |
| API key | YOUR_VOYAGEAGE_API_KEY |
| API address | https://api.voyageage.com |
The request preview should resolve to https://api.voyageage.com/v1/chat/completions. Do not paste that full endpoint into the API address field.
4. Fetch and select models
- Select Get model list or Manage.
- Cherry Studio requests
https://api.voyageage.com/v1/models. - Select
+beside each model you want to add. - If fetching fails, use
+to enter a complete Console model ID manually. - Enable the provider switch in the upper-right corner.
Suggested chat models from shared data are gpt-5.6-sol, gpt-5.6-terra, gpt-5.6-luna. Do not select an embedding-only model for chat.
5. Test and verify
- Select Check beside the API key.
- If it fails, make the last model in the list a known chat model and retry.
- In chat, select the VoyageAge provider and model.
- Send:
Reply only: VoyageAge connected. - Confirm a matching
chat/completionsrequest appears in VoyageAge Console.
Success: The Check button passes, chat replies, and Console records the same model request.
6. Endpoint compatibility
| Endpoint | VoyageAge route | Cherry Studio use |
|---|---|---|
/v1/chat/completions |
Present | Custom OpenAI provider chat |
/v1/responses |
Present | Not used by normal Cherry Studio chat; used by Codex |
/v1/embeddings |
Present | Only with an embeddings-capable model |
A route being present does not mean every model supports it. Follow Console and https://api.voyageage.com/v1/models.
Troubleshooting
- Check fails: Verify provider type OpenAI, API address
https://api.voyageage.com, and a supported chat model. - 401 Unauthorized: Paste the key again without spaces and confirm it is active.
- 403 Forbidden: Check key group, account status, and model permission.
- 404 Endpoint Not Found: Remove duplicate
/v1or/chat/completions; the API address must behttps://api.voyageage.com. - Cannot fetch models: Test
https://api.voyageage.com/v1/modelsin a terminal, then add the model manually if only the client fetch fails. - Model Not Found: Remove IDs copied from old screenshots and fetch the current list.
- Model missing from chat: Add it with
+and enable the provider switch. - Embedding model selected for chat: Remove it and choose a Chat Completions model.
- Reply but no Console usage: Confirm the current conversation is actually using the VoyageAge provider.
Desktop clients
Claude Desktop
Connect Claude Desktop through Gateway.
Claude Desktop can connect to VoyageAge through its Anthropic-compatible Gateway. This guide applies to versions that expose “Configure third-party inference”.
Note: Last reviewed on
2026-07-31. If the third-party inference entry is missing, update the app first; availability can still vary by client version or account.
1. Before you start
- Create a dedicated VoyageAge API key and make sure your account has balance.
- Install the current Claude Desktop.
- Gateway base URL:
https://api.voyageage.com - Get model IDs from Console or
https://api.voyageage.com/v1/models.
2. Open third-party inference
- On macOS choose
Help → Troubleshooting → Enable Developer mode. - On Windows enable Developer mode from the current app menu.
- Choose
Developer → Configure third-party inference.
3. Configure Gateway
| Field | Value |
|---|---|
| Connection | Gateway |
| Gateway base URL | https://api.voyageage.com |
| Gateway API key | YOUR_VOYAGEAGE_API_KEY |
| Other settings | Keep existing values |
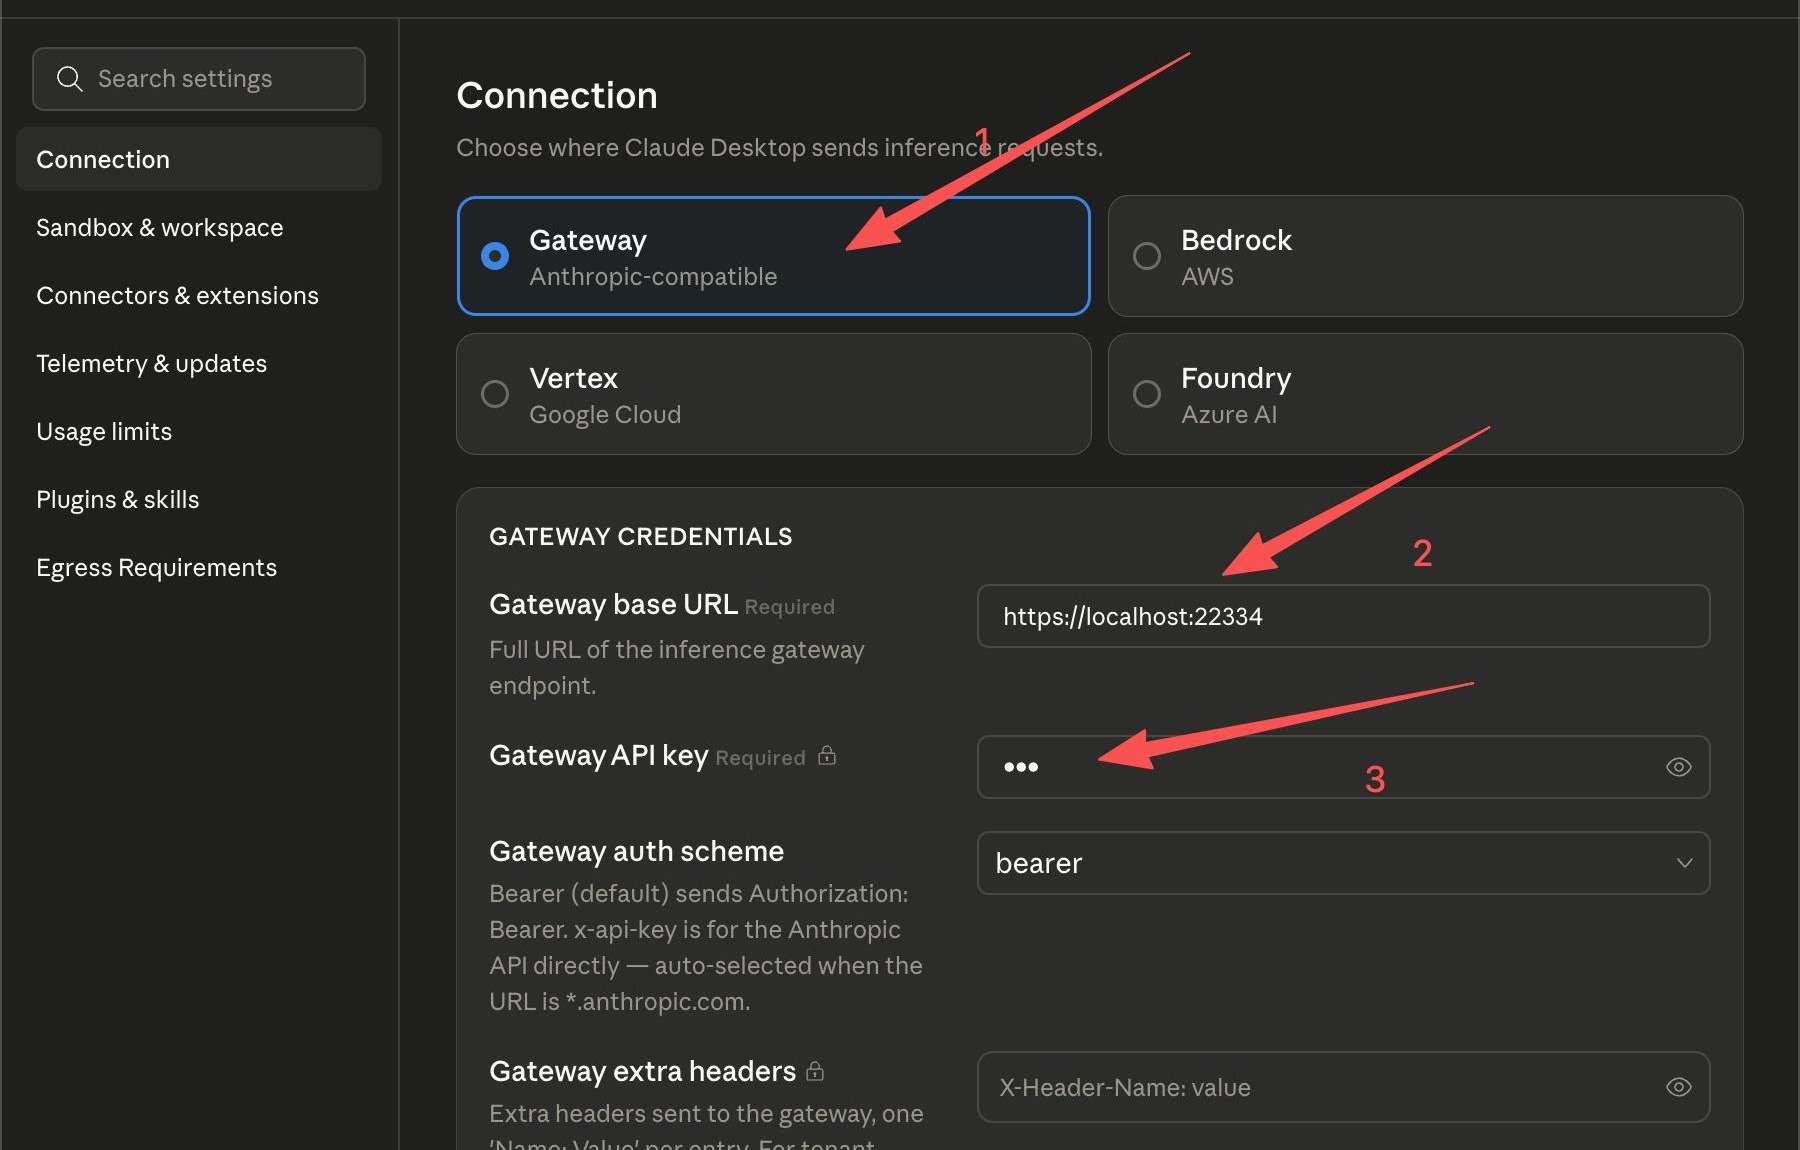
Do not append /v1/messages. Save, fully quit Claude Desktop, and reopen it.
4. Add models
Under Identity & Models, add exact Anthropic model IDs returned by VoyageAge. Shared examples are claude-opus-5, claude-fable-5, claude-opus-4-8.
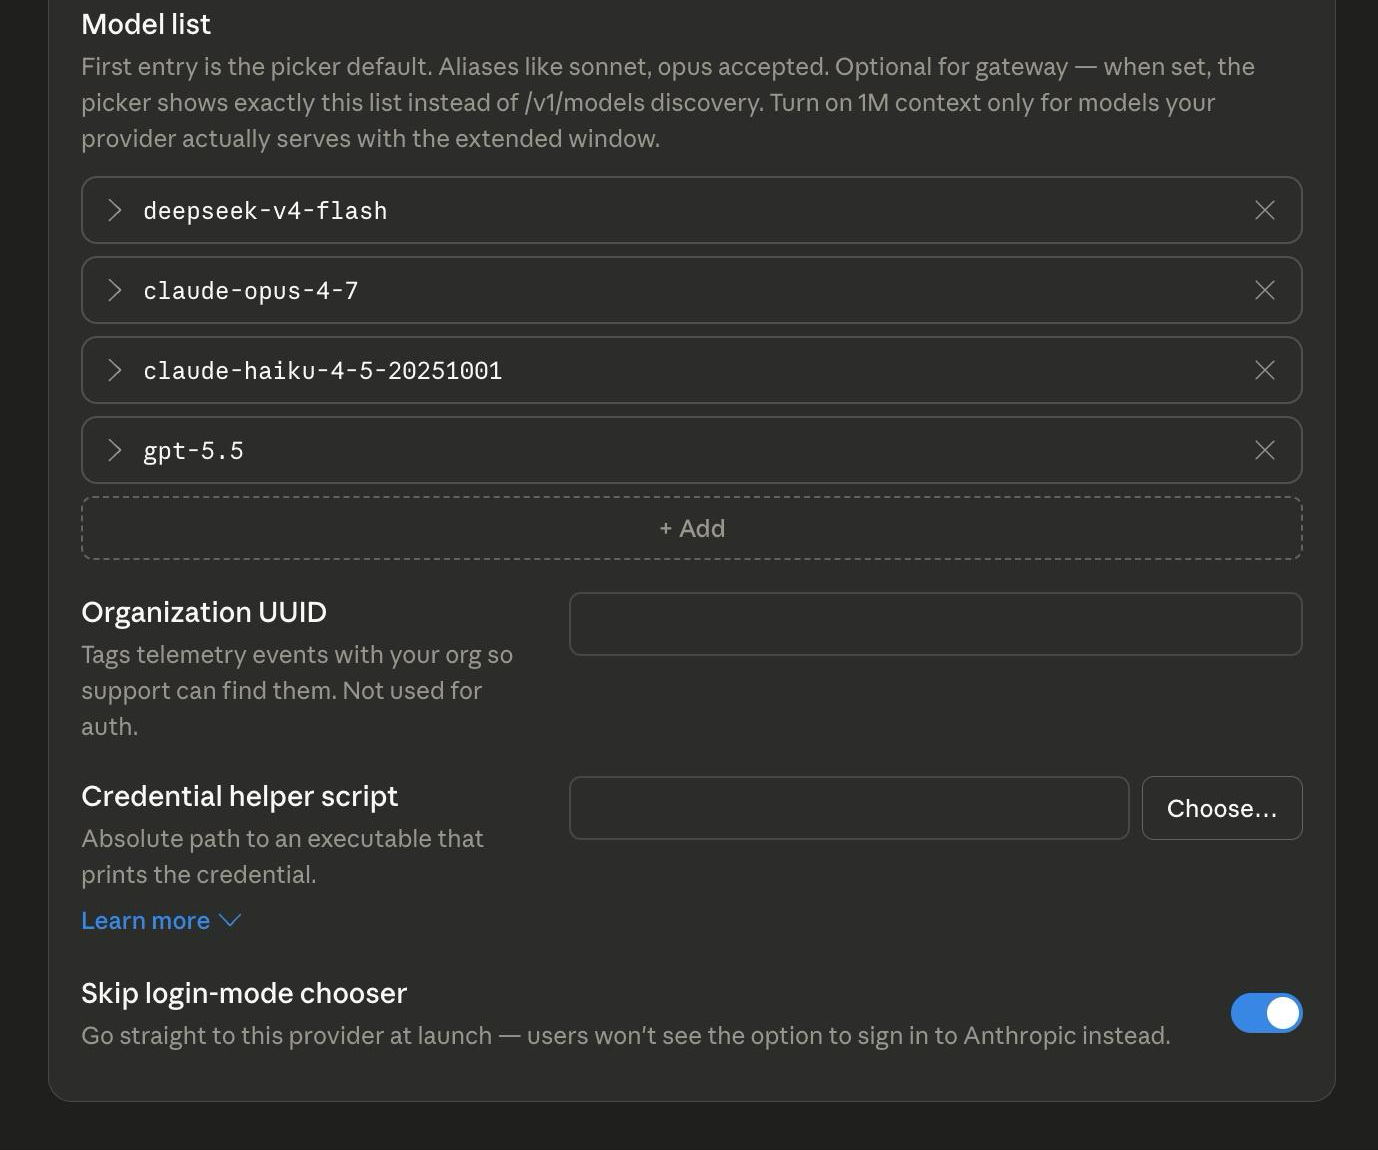
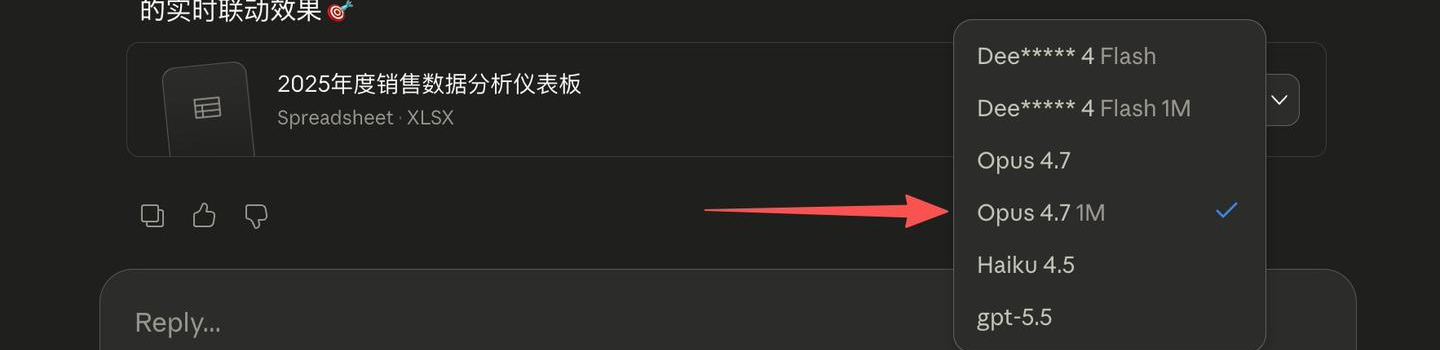
Restart the app after changing model entries.
5. Verify
Select the added model, send Reply only: VoyageAge connected, and confirm a matching request appears in VoyageAge Console.
Success: The app replies and Console records the same model request through VoyageAge.
Troubleshooting
- No third-party inference entry: Update Claude Desktop and re-enable Developer mode; the current version/account may not expose it.
- 401 Unauthorized: Paste the key again without spaces and confirm it is active.
- 404 Endpoint Not Found: Use only
https://api.voyageage.comas Gateway base URL. - Model Not Found: Copy an exact current model ID from Console.
- Model missing from picker: Save Identity & Models and fully restart the app.
- Reply but no Console record: Confirm the selected model belongs to the VoyageAge Gateway rather than a built-in provider.
Desktop clients
OpenCode
Add Voyageage as a custom provider.
OpenCode Desktop can use VoyageAge through an OpenAI-compatible Custom Provider.
Note: Last reviewed on
2026-07-31.
1. Before you start
- Create a dedicated VoyageAge API key and make sure your account has balance.
- Install OpenCode Desktop.
- Base URL:
https://api.voyageage.com - Get model IDs from
https://api.voyageage.com/v1/models.
2. Open Custom Provider
- Open Settings from the lower-left corner.
- Choose Server → Providers.
- Select + Connect beside Custom Provider.
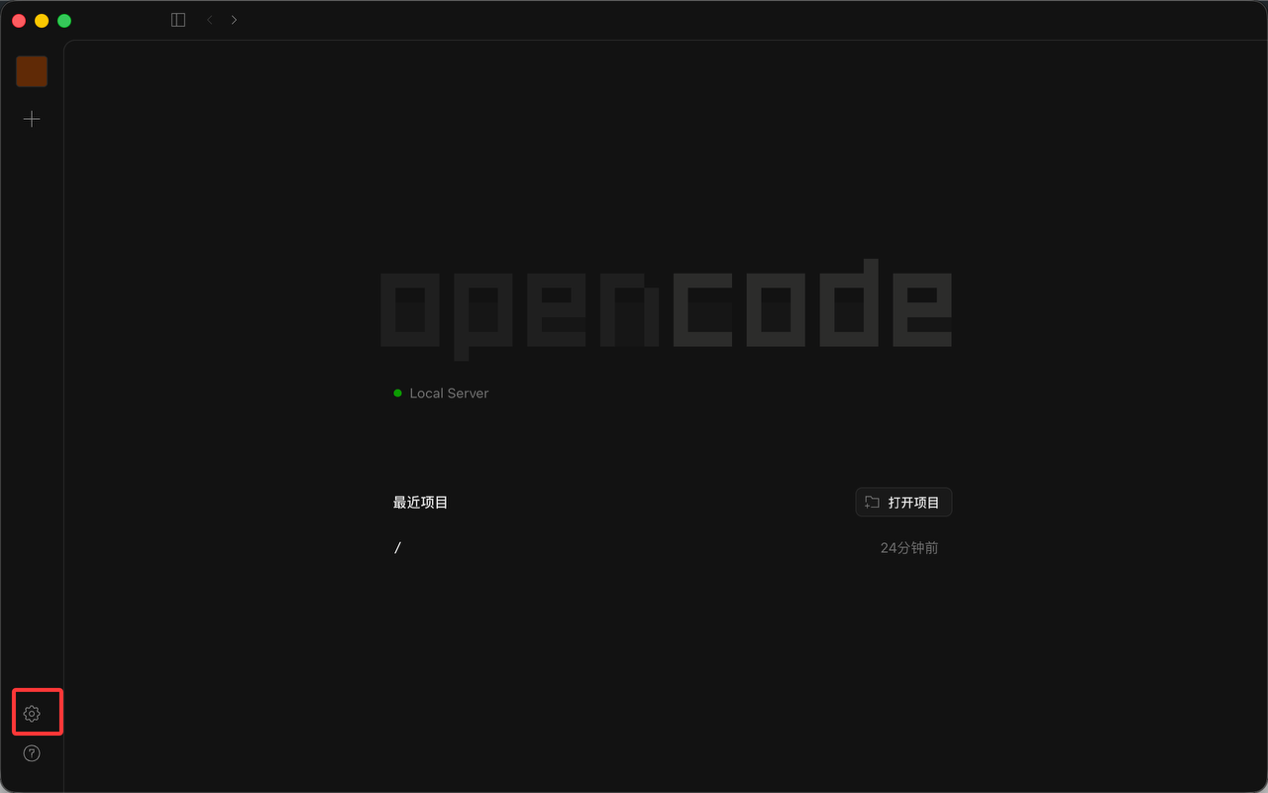
3. Enter the provider
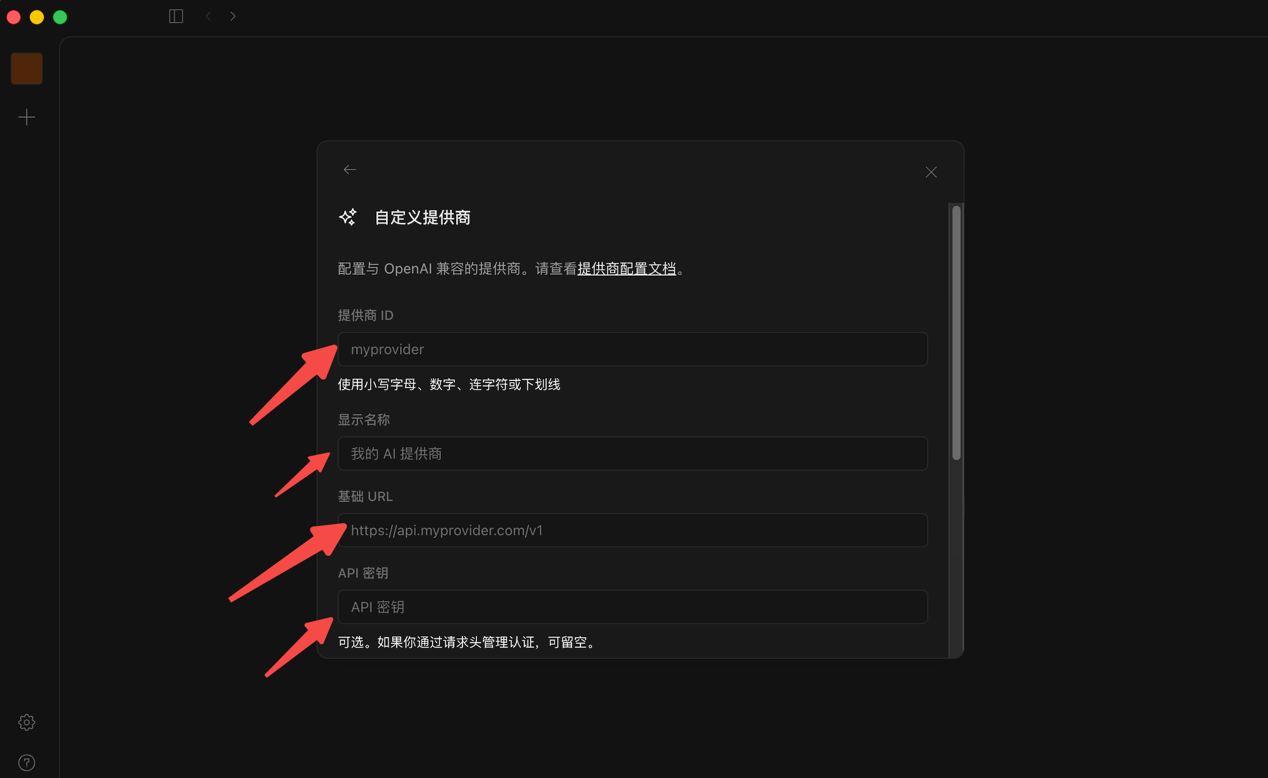
| Field | Value |
|---|---|
| Provider ID | voyageage |
| Display name | VoyageAge |
| Base URL | https://api.voyageage.com |
| API key | YOUR_VOYAGEAGE_API_KEY |
| Optional headers | Leave empty |
Select + Add Model, add gpt-5.6-sol or another current OpenAI model ID, then select Submit.
4. Verify
Create a test conversation, select the VoyageAge provider and model, and send Reply only: VoyageAge connected. Confirm the same request in VoyageAge Console.
Success: OpenCode replies and Console shows the VoyageAge key, model, and usage.
OpenCode's custom provider uses the OpenAI protocol. Use Claude Desktop or Claude Code when you require Anthropic-specific behavior.
Troubleshooting
- 401 Unauthorized: Paste the API key again and confirm it is active.
- 404 Endpoint Not Found: Check the provider type and Base URL; do not duplicate
/v1/chat/completions. - Model Not Found: Copy the complete ID from
https://api.voyageage.com/v1/models. - Model missing from picker: Submit the provider, then reopen the picker or restart OpenCode.
- Wrong provider used: Select VoyageAge again in the current conversation.
- No Console record: Check the active provider, account, and time range.
Desktop clients
WorkBuddy
Create a custom provider in Model Settings.
WorkBuddy supports custom providers in Model Settings. This guide follows the existing client fields and connects VoyageAge as an OpenAI-compatible service.
Note: Last reviewed on
2026-07-31.
1. Before you start
- Create a dedicated VoyageAge API key and make sure your account has balance.
- Install the current WorkBuddy.
- Endpoint:
https://api.voyageage.com - Get model IDs from
https://api.voyageage.com/v1/models.
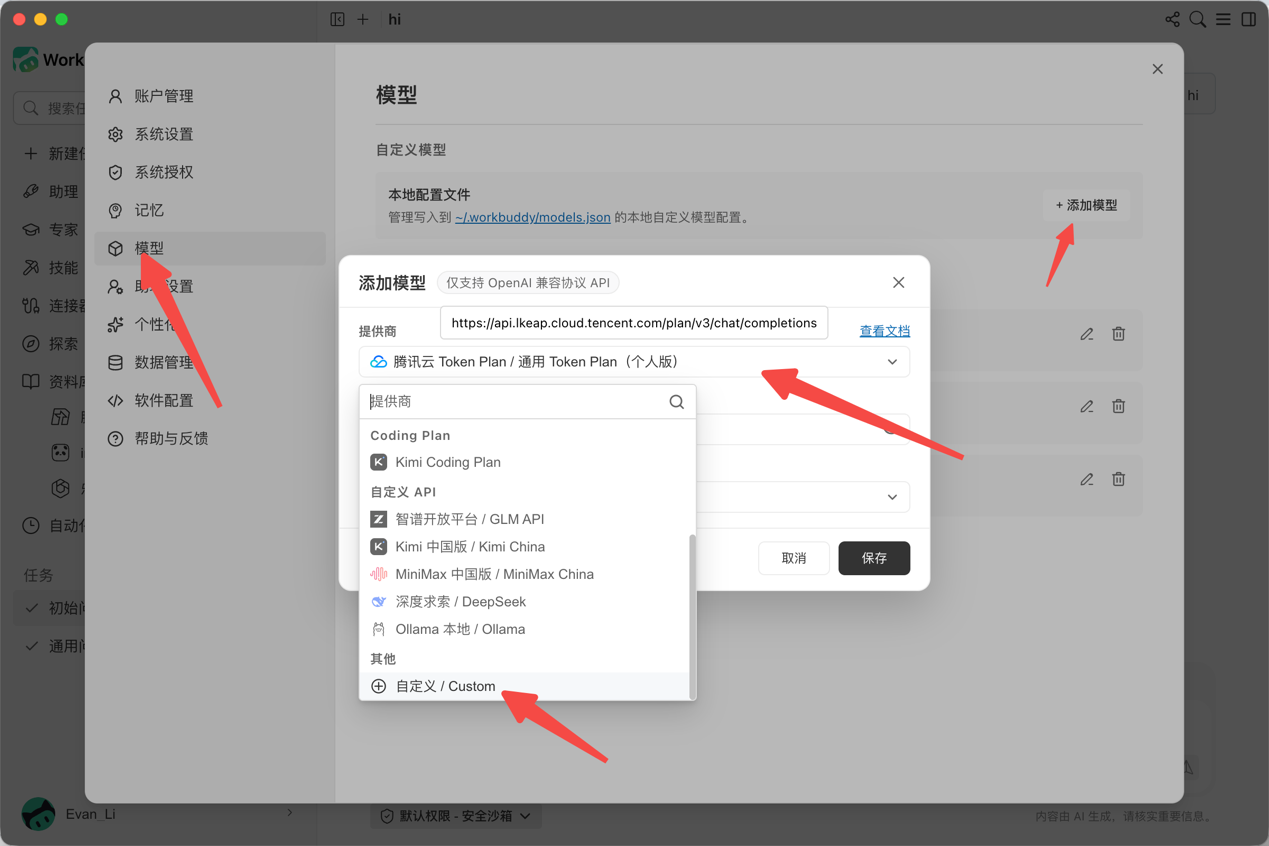
2. Open Model Settings
- Open the account menu in the lower-left corner.
- Choose Settings → Models.
- Select Add model, then choose Custom.
3. Configure the provider
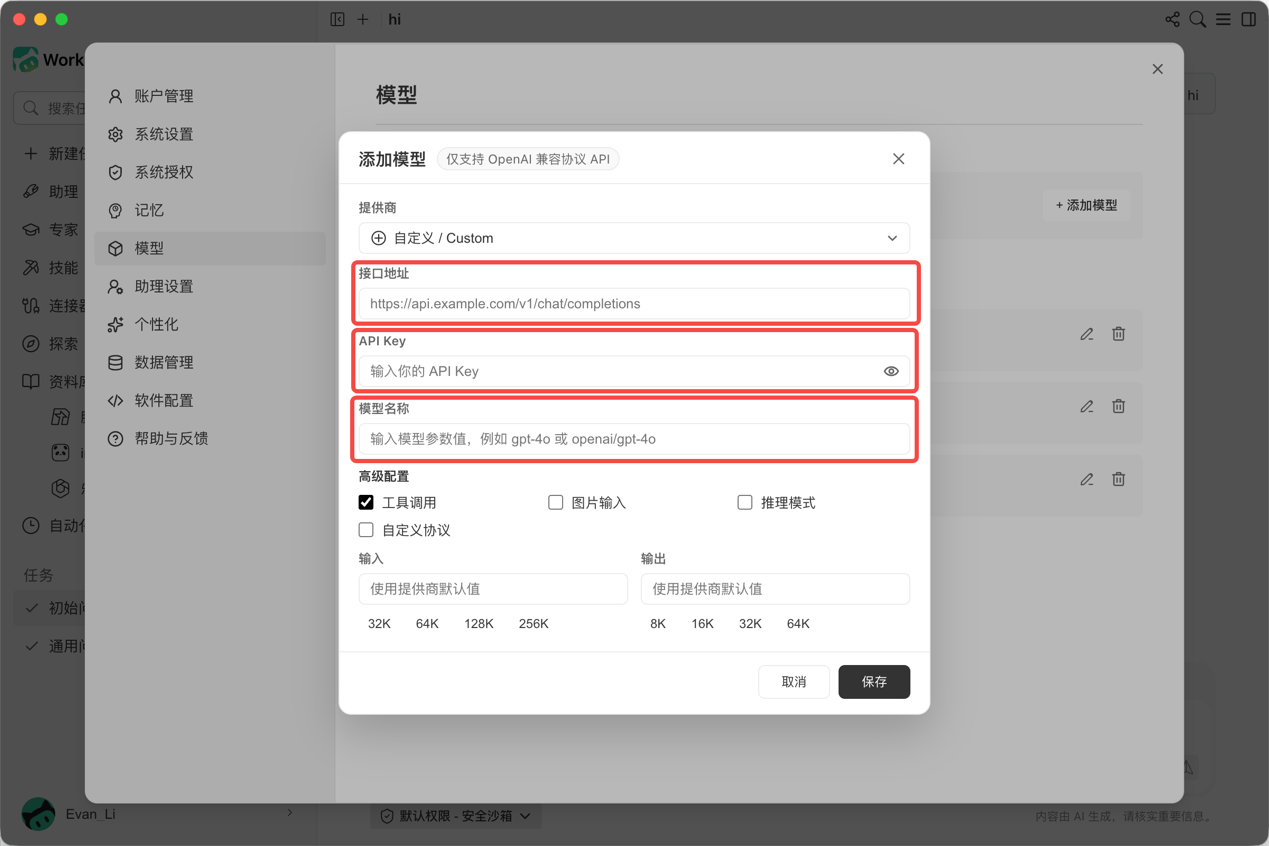
| Field | Value |
|---|---|
| Endpoint | https://api.voyageage.com |
| API key | YOUR_VOYAGEAGE_API_KEY |
| Model name | gpt-5.6-sol or another current ID |
| Other settings | Keep defaults |
Save, then reopen the model picker. Shared OpenAI examples are gpt-5.6-sol, gpt-5.6-terra, gpt-5.6-luna; use https://api.voyageage.com/v1/models for the complete current list.
4. Verify
Select the new model below the chat input, send Reply only: VoyageAge connected, and confirm a matching request in VoyageAge Console.
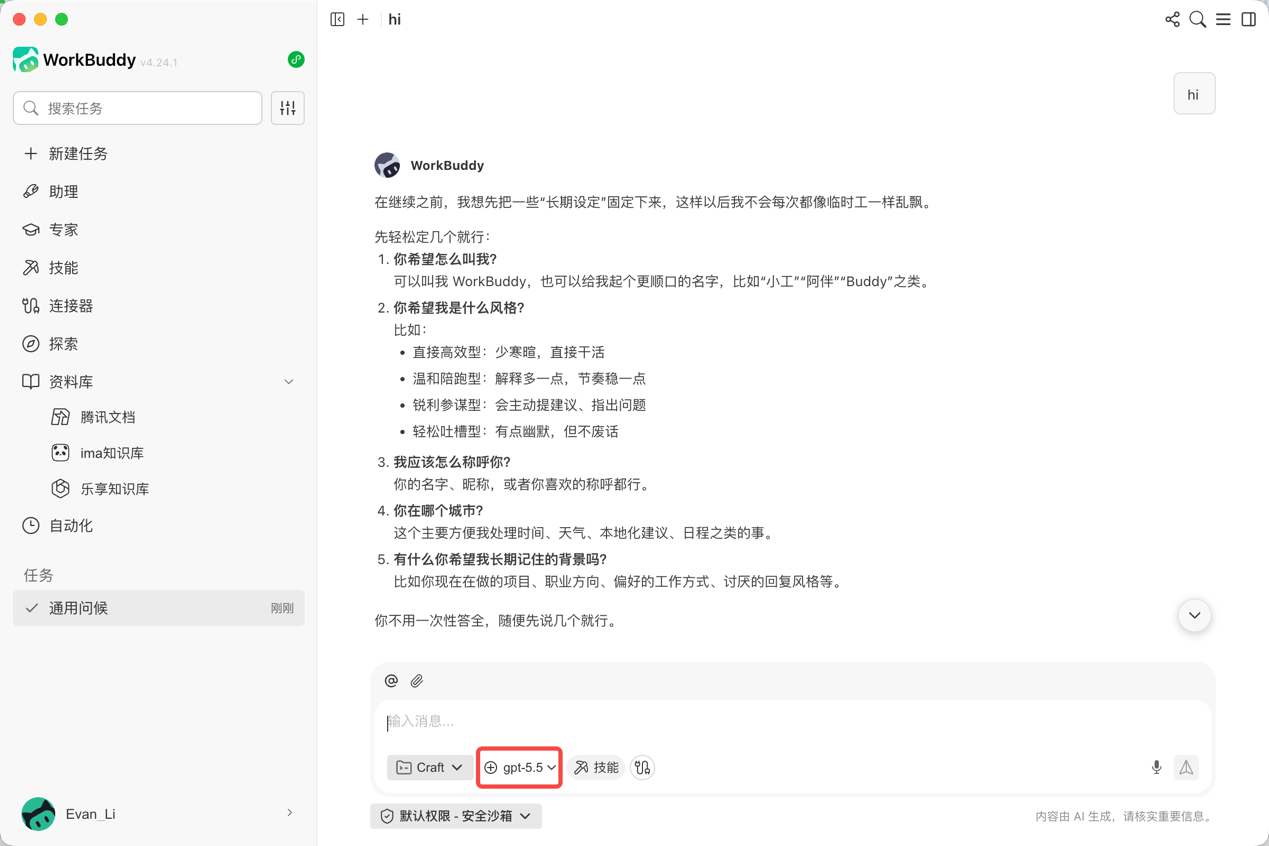
Success: The model is selectable, chat replies, and Console records the same model request.
Troubleshooting
- 401 Unauthorized: Paste the key again and confirm it is active.
- 404 Endpoint Not Found: Restore the endpoint to
https://api.voyageage.comwithout an extra request path. - Model Not Found: Copy the complete ID from
https://api.voyageage.com/v1/models. - Model missing: Refresh the model list or restart WorkBuddy after saving.
- Changes do not apply: Remove an older same-name provider and add it again.
- No Console record: Confirm the current conversation selected the new VoyageAge model.
Command-line tools
Codex CLI
Configure the OpenAI Responses provider.
Codex CLI is a terminal coding agent. This guide adds a VoyageAge Responses provider to the user-level ~/.codex/config.toml and keeps the API key in a dedicated environment variable.
Recommended — Prefer a GUI?
Configure VoyageAge with CC Switch instead of editing
config.tomlmanually. The manual setup below remains available.
Note: Last reviewed on
2026-07-31. The current official provider configuration acceptswire_api = "responses".
Looking for a quick walkthrough? See the Codex custom API provider setup guide.
1. Before you start
- Create a dedicated VoyageAge API key and make sure your account has balance.
- Install Node.js and npm.
- Base URL:
https://api.voyageage.com/v1 - Example model:
gpt-5.6-sol - Config path:
%USERPROFILE%\.codex\config.tomlon Windows,~/.codex/config.tomlon macOS/Linux.
2. Install and check Codex CLI
npm install -g @openai/codex
codex --version
Continue only after a version is displayed.
3. Add the provider configuration
Back up any existing file, then merge this configuration into it:
model_provider = "voyageage"
model = "gpt-5.6-sol"
model_reasoning_effort = "high"

[model_providers.voyageage]
name = "VoyageAge"
base_url = "https://api.voyageage.com/v1"
env_key = "VOYAGEAGE_API_KEY"
wire_api = "responses"
Windows PowerShell
New-Item -ItemType Directory -Force -Path "$HOME\.codex" | Out-Null
notepad "$HOME\.codex\config.toml"
Windows CMD
if not exist "%USERPROFILE%\.codex" mkdir "%USERPROFILE%\.codex"
notepad "%USERPROFILE%\.codex\config.toml"
macOS / Linux
mkdir -p ~/.codex
${EDITOR:-nano} ~/.codex/config.toml
Edit existing top-level keys instead of adding duplicates.
4. Set the API key
Temporary: Windows PowerShell
$env:VOYAGEAGE_API_KEY = "YOUR_VOYAGEAGE_API_KEY"
codex
Temporary: Windows CMD
set VOYAGEAGE_API_KEY=YOUR_VOYAGEAGE_API_KEY
codex
Temporary: macOS / Linux
export VOYAGEAGE_API_KEY="YOUR_VOYAGEAGE_API_KEY"
codex
Closing that terminal restores the previous environment. For a persistent Windows user variable:
[Environment]::SetEnvironmentVariable("VOYAGEAGE_API_KEY", "YOUR_VOYAGEAGE_API_KEY", "User")
For macOS Zsh, add the export to ~/.zshrc; Linux Bash users use ~/.bashrc. Open a new terminal after permanent changes.
5. Set and verify the model
Set the top-level model to an ID returned by https://api.voyageage.com/v1/models. Shared OpenAI examples are gpt-5.6-sol, gpt-5.6-terra, gpt-5.6-luna. Restart Codex after changing it.
Run codex in a test directory and ask: List the files in this directory without changing anything. Then confirm a matching responses request in VoyageAge Console.
Success: Codex replies and Console records the configured model through
https://api.voyageage.com/v1/responses.
Troubleshooting
- 401 Unauthorized: Check that the environment variable is loaded and recreate the key if needed.
- Codex ignores the Base URL: Confirm the user-level file and active
model_provider = "voyageage", then restart Codex. - 404 Endpoint Not Found: Use
https://api.voyageage.com/v1; do not append/responses. - Model Not Found: Copy the complete ID from
https://api.voyageage.com/v1/models. - New Windows variable is missing: User variables do not update an existing terminal; open a new one.
- TOML parse error: Remove duplicate keys and verify the provider table name.
- Restore official configuration: Restore your backup provider/model. The dedicated variable does not overwrite
OPENAI_API_KEY.
Command-line tools
Claude Code CLI
Install Claude Code and set Anthropic-compatible variables.
Claude Code is a terminal coding agent. VoyageAge connects through its Anthropic-compatible gateway using the official LLM gateway variables ANTHROPIC_BASE_URL and ANTHROPIC_AUTH_TOKEN.
Recommended — Prefer a GUI?
Configure VoyageAge with CC Switch if you prefer not to manage environment variables manually. The manual setup below remains available.
Looking for the fast path? See the Claude Code custom API endpoint setup guide. This section remains the complete installation and troubleshooting reference.
Note: Last reviewed on
2026-07-31. This guide sets only the required variables and avoids unverified model alias variables.
1. Before you start
- Create a dedicated VoyageAge API key and make sure your account has balance.
- Base URL:
https://api.voyageage.com - Example model:
claude-opus-5 - Use Bash, Zsh, or Fish on macOS/Linux. On Windows, use WSL or Git for Windows Bash.
2. Install and check Claude Code
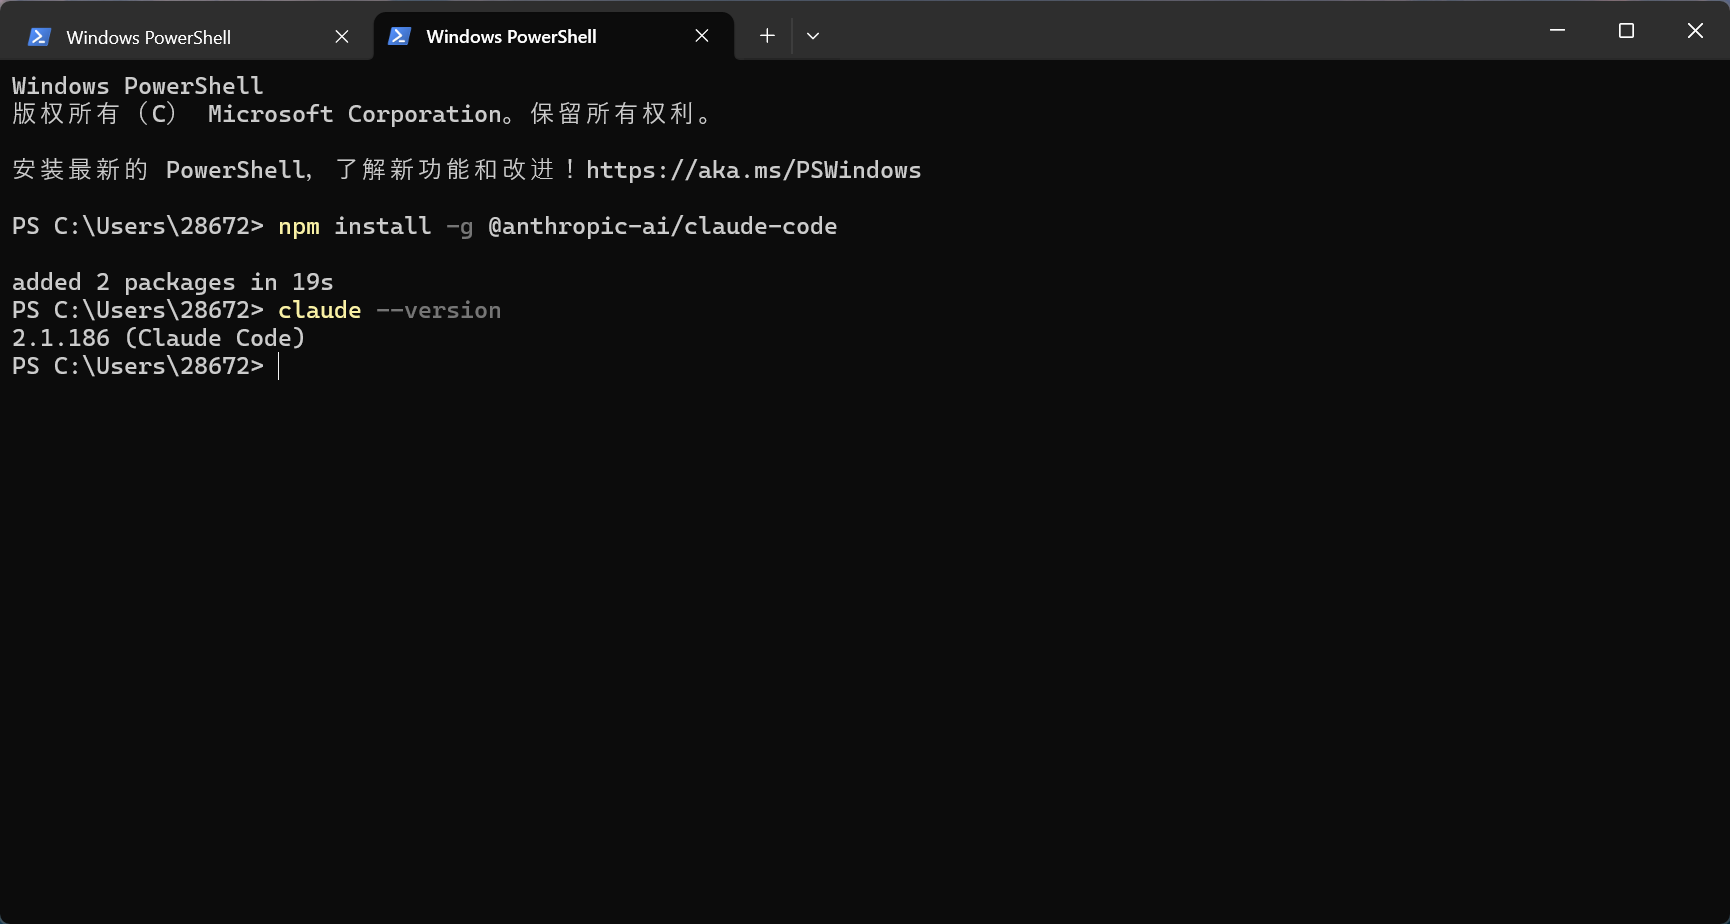
Install Node.js 18+ and npm, then run:
npm install -g @anthropic-ai/claude-code
claude --version
claude doctor
Native Windows mode requires Git for Windows. If Bash is not found:
$env:CLAUDE_CODE_GIT_BASH_PATH = "C:\Program Files\Git\bin\bash.exe"
3. Test with temporary variables
Windows PowerShell
$env:ANTHROPIC_BASE_URL = "https://api.voyageage.com"
$env:ANTHROPIC_AUTH_TOKEN = "YOUR_VOYAGEAGE_API_KEY"
$env:ANTHROPIC_MODEL = "claude-opus-5"
claude
Windows CMD
set ANTHROPIC_BASE_URL=https://api.voyageage.com
set ANTHROPIC_AUTH_TOKEN=YOUR_VOYAGEAGE_API_KEY
set ANTHROPIC_MODEL=claude-opus-5
claude
macOS / Linux
export ANTHROPIC_BASE_URL="https://api.voyageage.com"
export ANTHROPIC_AUTH_TOKEN="YOUR_VOYAGEAGE_API_KEY"
export ANTHROPIC_MODEL="claude-opus-5"
claude
Temporary values disappear when that terminal closes and do not overwrite your normal Anthropic setup.
4. Save variables permanently
On Windows, set the same three names with [Environment]::SetEnvironmentVariable(..., "User"), then open a new terminal. On macOS/Linux, add the three export lines to ~/.zshrc or ~/.bashrc and source that file.
Set ANTHROPIC_MODEL to an ID returned by https://api.voyageage.com/v1/models; shared examples are claude-opus-5, claude-fable-5, claude-opus-4-8. Restart Claude Code after changing it.
5. Verify
Run claude in a test directory and ask: List files without modifying anything. Confirm the reply and a matching Anthropic-compatible request in VoyageAge Console.
Success: Claude Code replies and Console records the same model request through VoyageAge.
6. Restore the previous setup
Close the terminal if you used temporary variables. Remove the three user variables or shell startup lines if you made them permanent, then open a new terminal.
Troubleshooting
- 401 Unauthorized: Check that
ANTHROPIC_AUTH_TOKENis loaded and the key remains active. - Still calling Anthropic directly: Print
ANTHROPIC_BASE_URLand confirm it equalshttps://api.voyageage.com. - Model Not Found: Copy the current ID from
https://api.voyageage.com/v1/models, updateANTHROPIC_MODEL, and restart. - 404 Endpoint Not Found: Do not append
/v1/messagesto the Base URL. - Old Windows terminal has no variable: Close every terminal window and start a new one.
- Bash not found: Install Git for Windows or use WSL and verify
CLAUDE_CODE_GIT_BASH_PATH. - No Console record: Make sure Claude Code was launched from the terminal containing the VoyageAge variables.
IDE extensions
VS Code + Cline
Set up Cline with OpenAI Compatible.
Cline is a coding agent for VS Code. Select OpenAI Compatible, then enter the VoyageAge address, API key, and model ID.
Note: Last reviewed on
2026-07-31. The settings entry can move between Cline versions, but the provider fields remain the same.
1. Before you start
- Create a dedicated VoyageAge API key and make sure your account has balance.
- Install VS Code.
- Install the Cline extension published by saoudrizwan.
- API address:
https://api.voyageage.com - Get model IDs from
https://api.voyageage.com/v1/models.
2. Open Cline API settings
- Open Extensions with
Command + Shift + Xon macOS orCtrl + Shift + Xon Windows/Linux. - Install Cline and open its sidebar.
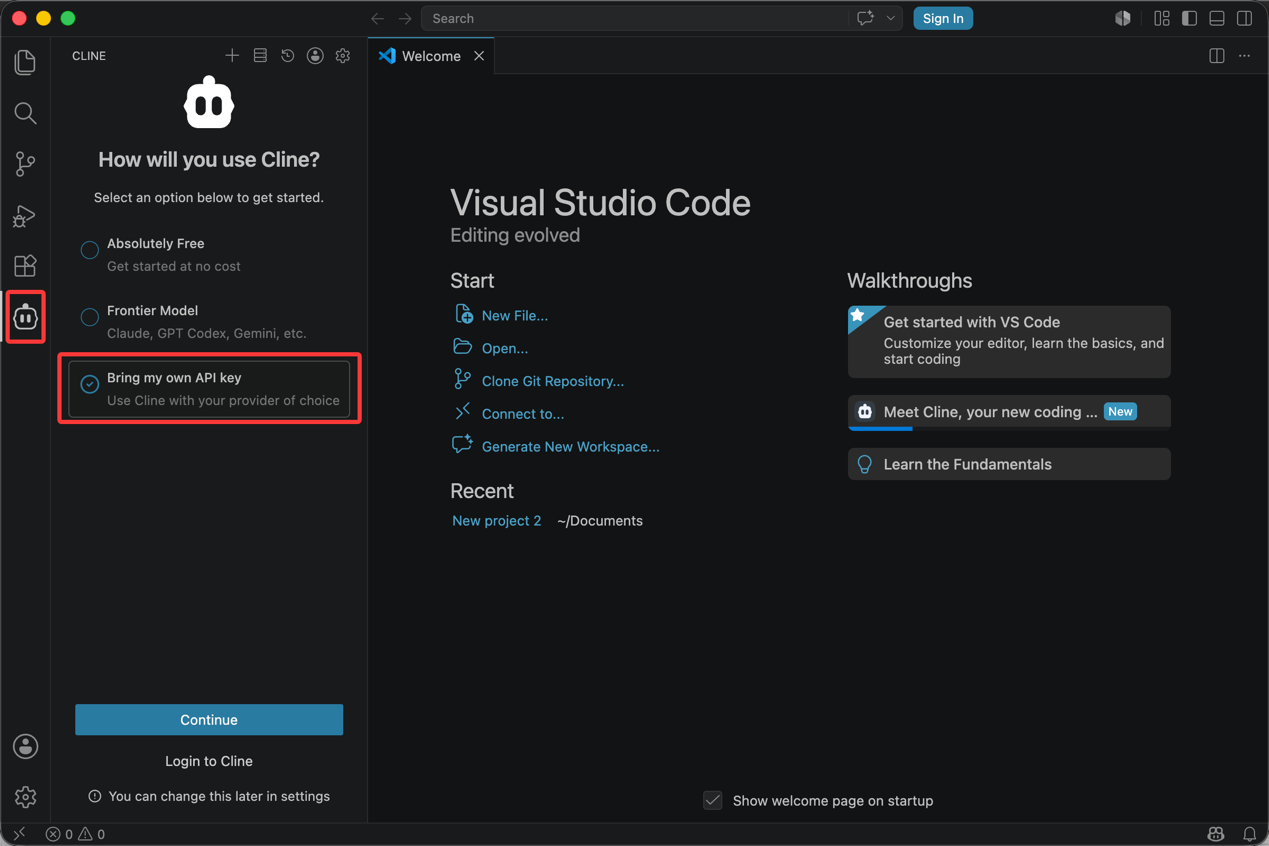
- Choose Bring my own API key during onboarding.
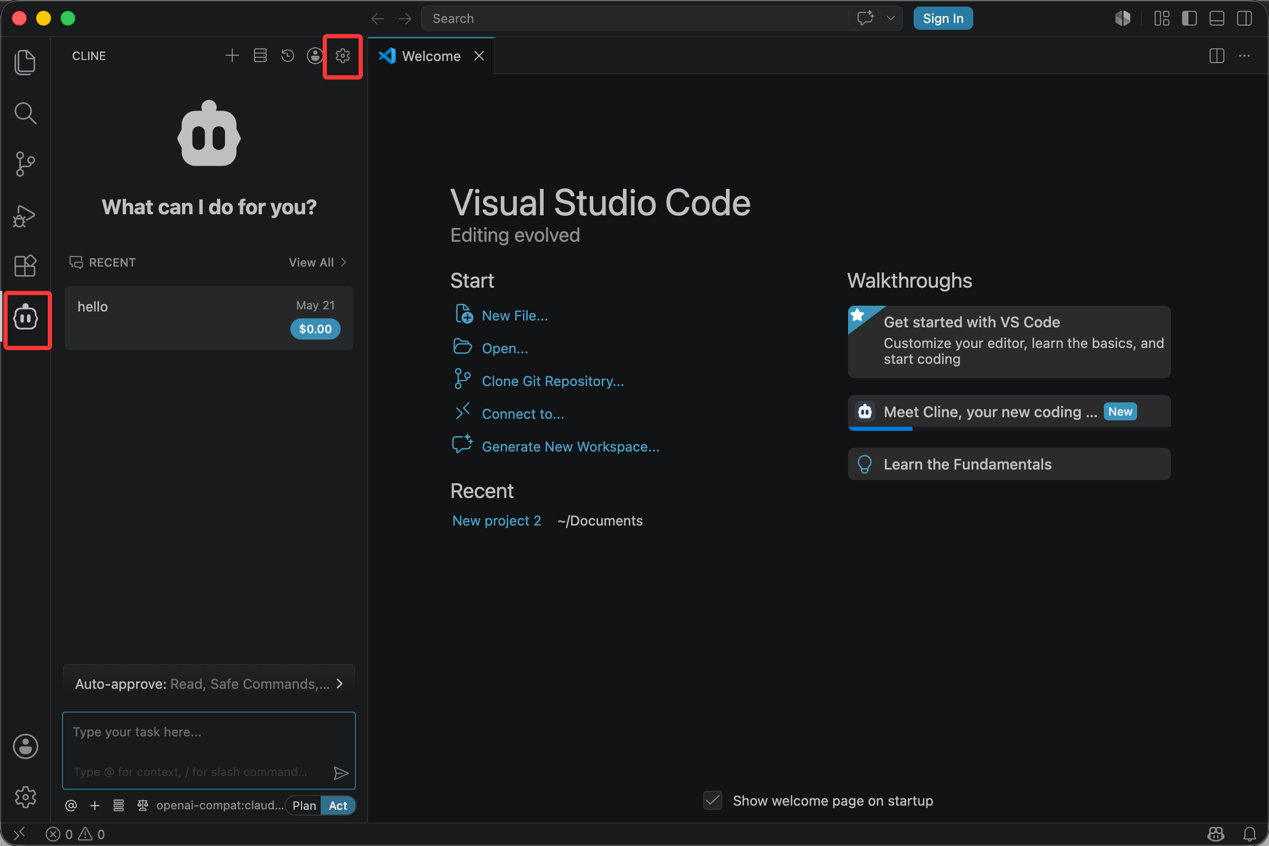
- Open the settings icon and API Configuration.
3. Enter VoyageAge values
| Field | Value |
|---|---|
| API Provider | OpenAI Compatible |
| Base URL | https://api.voyageage.com |
| OpenAI Compatible API Key | YOUR_VOYAGEAGE_API_KEY |
| Model ID | gpt-5.6-sol or an exact Console ID |
| Custom Headers | Leave empty |
Do not enable Azure API version or Azure Identity Authentication. Save and reopen the Cline panel.
4. Configure and verify the model
Cline accepts a manually entered model ID. Shared OpenAI examples are gpt-5.6-sol, gpt-5.6-terra, gpt-5.6-luna, but use https://api.voyageage.com/v1/models for the current list.
Do not choose an embedding-only model for chat. For Anthropic-specific Claude behavior, prefer Claude Code.
Ask Cline to Read the project name without changing files, then confirm a matching chat/completions request in VoyageAge Console.
Success: Cline replies and Console records the same model request, confirming it did not call the official OpenAI endpoint.
Troubleshooting
- 401 Unauthorized: Paste the key again without spaces.
- 404 Endpoint Not Found: Confirm OpenAI Compatible and Base URL
https://api.voyageage.com; do not paste a full endpoint. - Empty model list: Enter a model ID manually after checking
https://api.voyageage.com/v1/models. - Model Not Found: Replace the ID with one returned for the current key.
- Still using OpenAI: Reopen API Configuration and confirm the active conversation uses the custom provider.
- Changes do not apply: Reload the VS Code window or reopen Cline.
- No Console record: Check the provider selected in the current conversation and the Console time range.